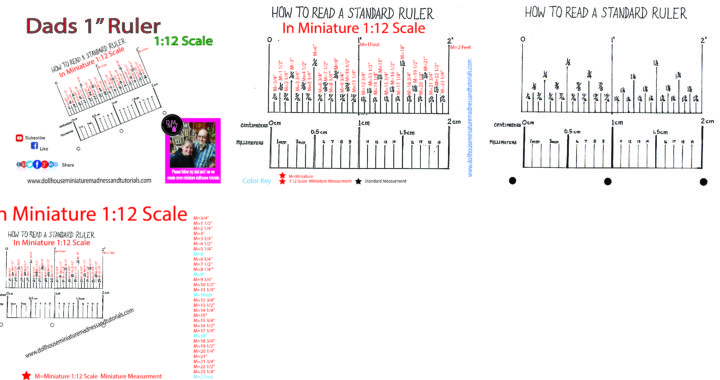
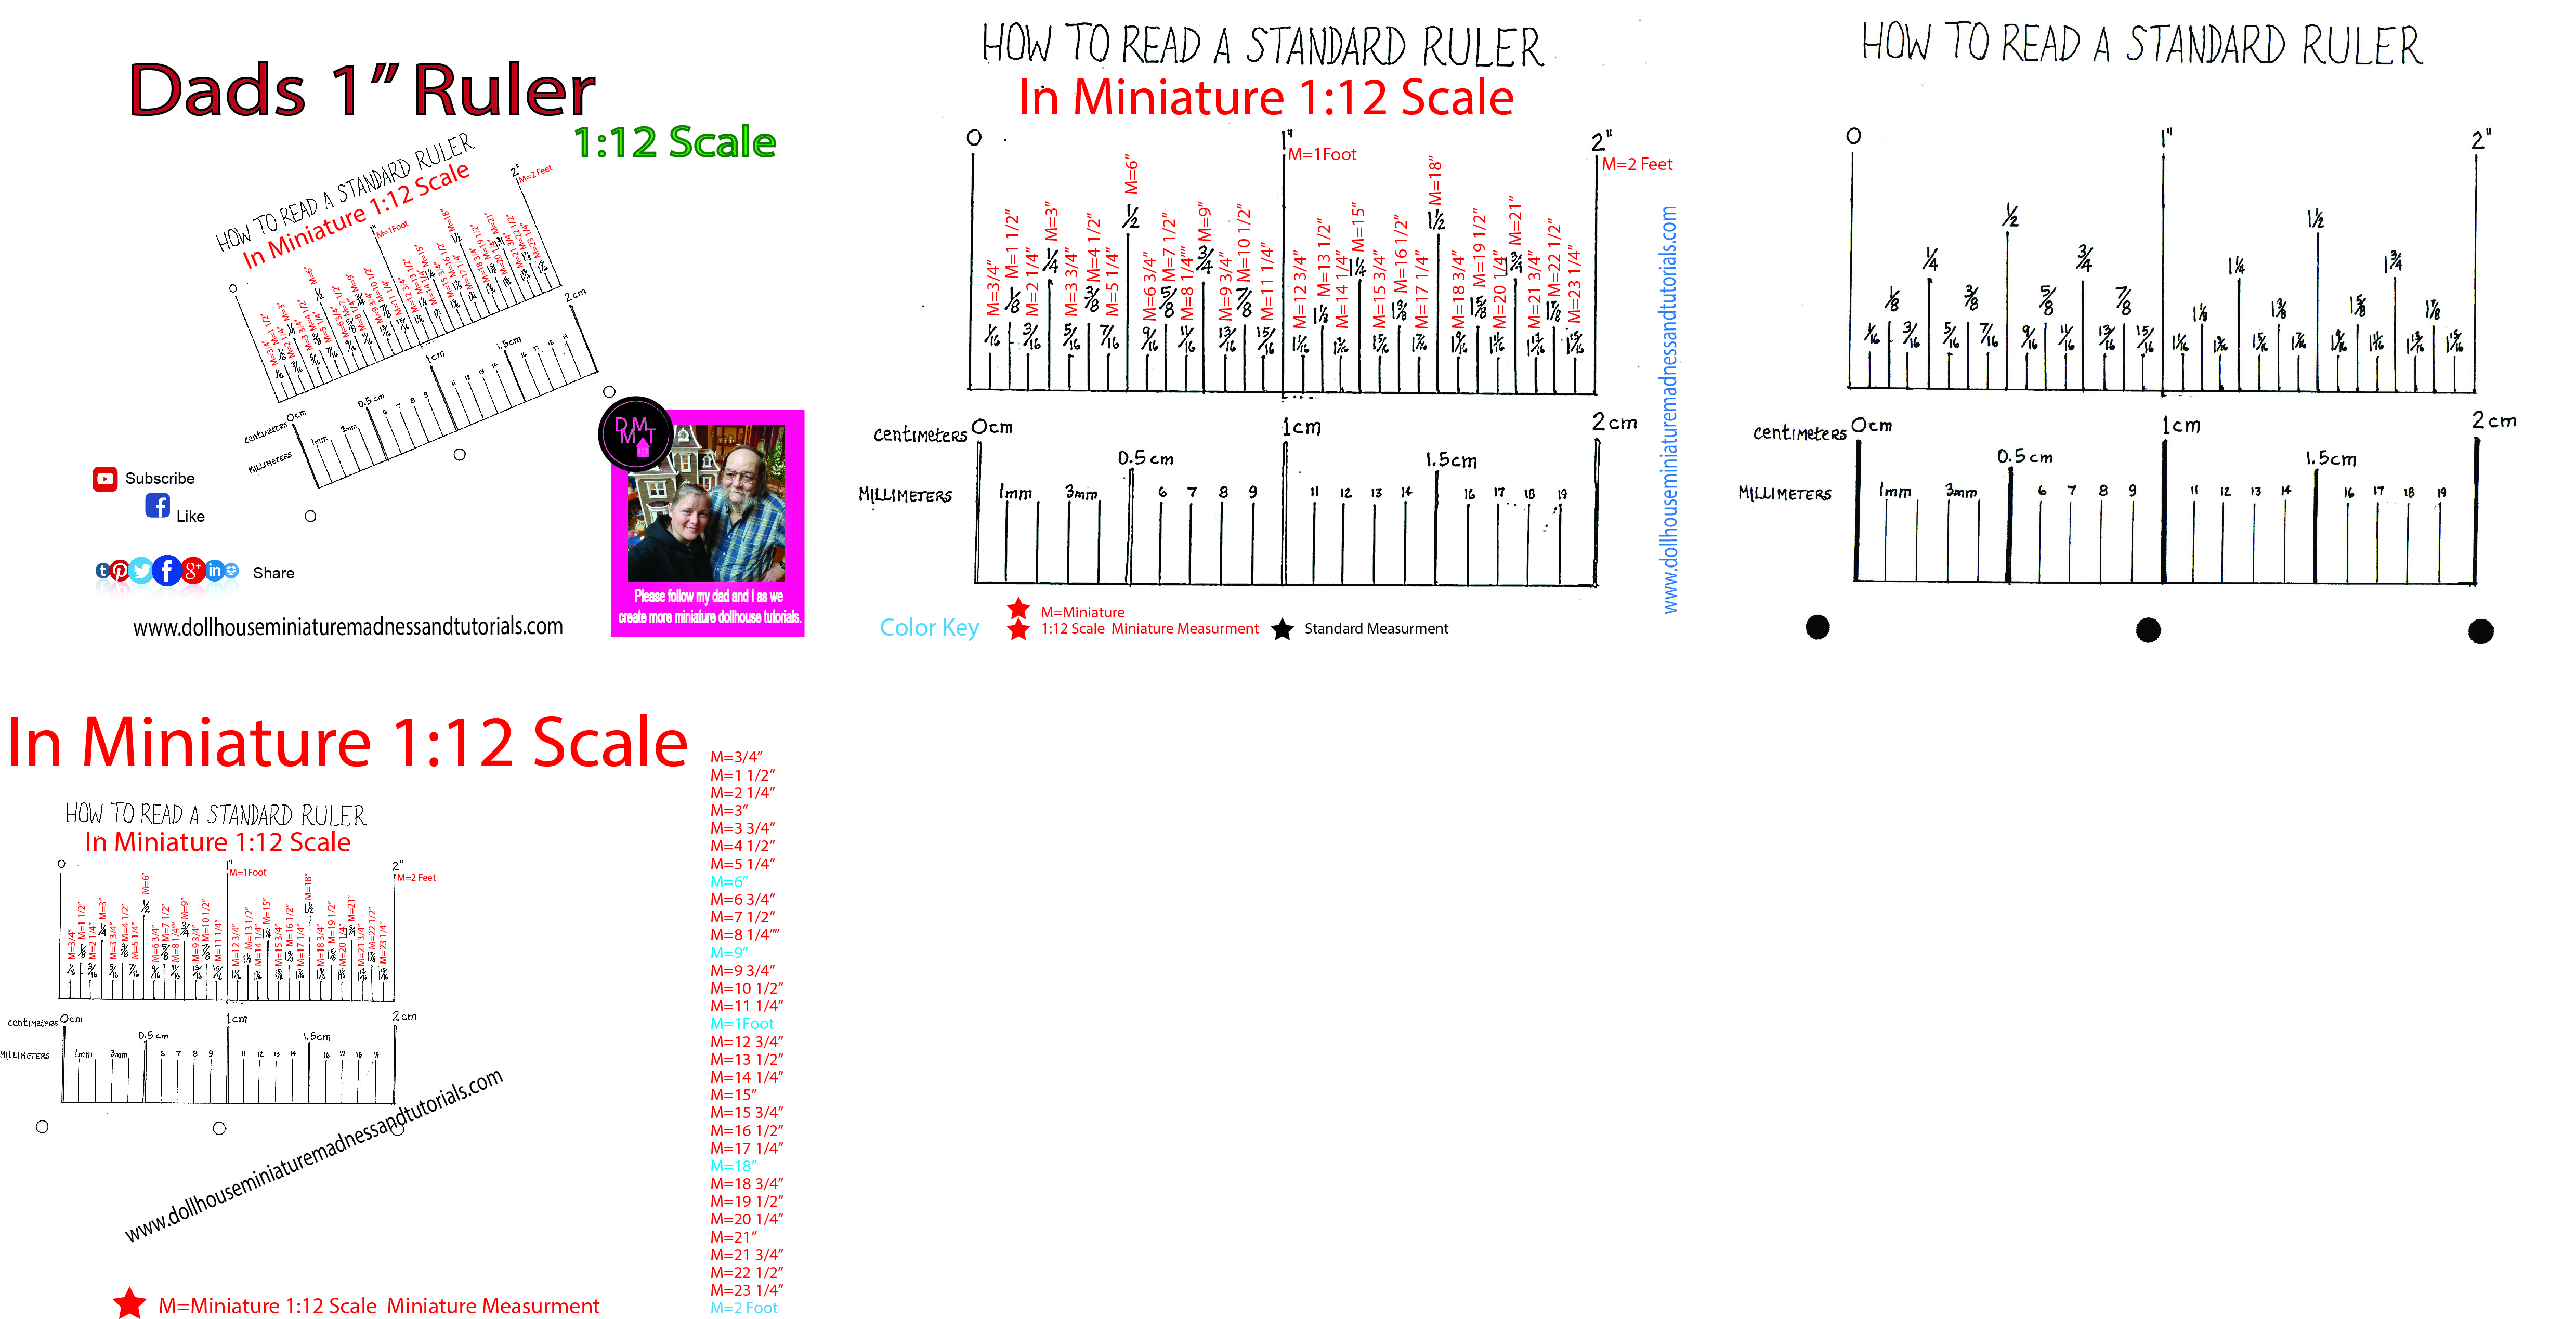
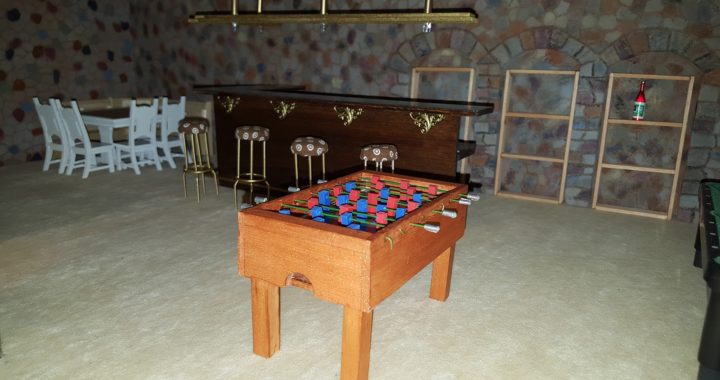
hi guys welcome back today I’m going to
0:04
show you how you can make a foosball
0:06
the very first thing you need to do is
0:08
you need to go on my website and you’re
0:09
going to need to print out this template
0:12
it has the measurements and everything
0:14
you wanted that you need and then this
0:17
piece here will give you a key on what
0:20
the actual parts all me like glue that’s
0:25
purple that’s the other little foods man
0:27
and then these are the handles and the
0:32
bumpers is the screen one
0:35
ok now when you’re doing it if you
0:38
measure your thing you can use this as a
0:40
guide to where you want to put your
0:44
alright so gonna print that out it’s
0:46
under dollhouse measurements and
0:48
tutorials com and we’ll get started
0:52
so once you have all of your pieces cut
0:54
out but you’re going to have to do is
0:57
you’re out to separate them and for the
1:01
ends here i just use a band saw and cut
1:05
out that half moon right there half
1:09
circle but you can actually use a drill
1:12
bit if you want and just drill it out
1:14
then sand it down or you can cut it out
1:17
using that little coping saw same way
1:23
alright so you’re going to have a bottom
1:25
a top or the game feels going to be if
1:29
you want to paint this you can but as
1:33
long as you put the template to size
1:35
you’ll see it says on this one printed
1:41
scale if you print it to scale and you
1:43
cut it out exactly how it prints these
1:47
here fields will match this nice so
1:51
it’ll work perfect now mine is cut a
1:54
little bit bigger because i went by the
1:56
measurements and like i said before
1:58
sometimes you lose a little bit when
1:59
you’re scaling it into the computer so
2:02
mine’s just school lightly off there so
2:05
my fields not gonna fit perfect
2:08
however if you cut it out as this size
2:10
and uses your template
2:11
as it will write ok so what I’ve done is
2:21
I’ve taken the top piece and i put it
2:23
over top of the bottom piece and then
2:25
I’ve marked where the circles are going
2:28
to be okay at this point if you want
2:31
this to be painted you can paint it not
2:33
you don’t have to but what you do need
2:36
to do is you need to take your spacers
2:38
and you’re going to have to glue them
2:41
together and put them right on there
2:46
alright so i’m gonna go ahead and get
2:47
some glue and I’m gonna glue them
2:48
together and I’m a glue onto the space
2:51
ok so when you’re gluing it you want to
2:54
put glue on the corners of it and on the
2:57
one side of it to start with right and
3:00
then you’re going to press it in there
3:01
try to get it as straight as you can on
3:04
here leave in equal amounts on each side
3:08
and then equal amounts at the end you
3:15
can pull this down try to make it even
3:18
with this here and even with it here but
3:22
do not overlap that circle part
3:37
now once you have that done you can
3:39
clean the grew up around the edge if you
3:41
want but it’s not necessary because it’s
3:42
not going to be seen
3:44
so you got equal here equal here it’s
3:49
close to equal on the front and on the
3:59
make it even right now you’re gonna put
4:03
some glue on top of here
4:06
ok so now you’re going to glue this on
4:08
top here right but you need to make sure
4:11
that when you do it you have it even
4:14
otherwise it will end up being a monkey
4:27
just like that okay let it sit
4:37
and dry check all four sides right now
4:44
at this point while this is drying you
4:48
need to mark where you’re going to put
4:51
the line so like what i did is i held up
4:56
against it and then i trace where I want
4:58
my line to be so that way I know
5:02
ok once that’s dry them with glue the
5:08
ok so the next step is to go ahead and
5:11
put glue on all the sides and then you
5:15
want to add your side panels when you’re
5:24
putting this one this has to be at the
5:26
bottom and then you want to put glue on
5:46
and attach them at the bottom
5:57
okay now you’re going to squeeze this
5:59
together make sure you have it straight
6:03
make sure all your ends right here here
6:06
and all are all imagine just leave that
6:19
then we’ll let that dry
6:24
ok so now you can cut out your template
6:26
for the top and if you match yours up to
6:29
the template on there then they should
6:31
fit pretty perfect and then you can set
6:34
it in there and then apply some Mod
6:36
Podge before you put it on there put
6:37
some Mod Podge on top of it to seal it
6:39
since mine does not fit up i’m going to
6:41
actually go ahead and just paint that
6:44
little teeny tiny space there like i
6:47
said i made $OPERAND years the words
6:50
gonna fit if he’s long as you cut your
6:51
template for your wood to fit the
6:54
template i actually did mine as the
6:57
measurements so it’s just a tiny bit
6:59
bigger so it also a little bit in the
7:01
scanning process and creating part so
7:06
once that’s dry well first you want to
7:09
get rid of all of your excess glue along
7:11
the edge forget that go on there or
7:16
remove that other and then after that
7:21
then you want to apply your legs on the
7:23
bottom one in each corner and then glue
7:26
it all right so now you’re justifying
7:30
the glue on there and sticking it right
7:38
and then you let it dry make sure you
7:40
have them straight to not cook it and
7:43
then let them dry and it’ll stand like
7:49
ok so now like I’m going to mod podge
7:53
that on there and everything but the
7:54
purpose of having that board on the
7:56
inside is for the ball now this is
7:58
obviously just a bead but when it goes
8:01
down in there’s nowhere for it to go if
8:07
you notice it doesn’t go back any
8:09
further it just stays in that little
8:11
section right there so you should be
8:15
able to get it out pretty easily
8:18
alright and then we’ll go ahead and add
8:20
the rest of it to it and i’ll show you
8:23
the next step so stay too
8:33
ok so now you have pretty much the whole
8:36
thing put together you can at this point
8:39
my dodge your top one here but the next
8:44
step is to glue your quarter-inch pieces
8:47
on here but we have to drill the holes
8:48
for them first so we want to tape them
8:51
ok see you want to make sure that you
8:54
have them even on both ends before you
8:56
put your masking tape around it tape it
8:58
and then go again at the other end and
9:02
tape that just like that
9:06
ok so how have done this is I’ve laid
9:09
out my template and I’ve got it laying
9:10
on the side and I went in about a
9:12
quarter of an inch on each leaving even
9:15
spacing and then I marked where I want
9:18
my things to go now you want to go
9:20
directly down the center of that all the
9:27
that’s not the center but go down the
9:33
ok so for this part once i had my Center
9:35
marked i went ahead and i took a piece
9:38
of the same wire and i put it down the
9:46
center of that and i went ahead and
9:48
decided to go ahead and draw slowly
9:52
other now I did turn my wire into like a
9:58
little half . so now you just want to go
10:03
and do all of them just like that
10:06
ok so once you have them drill then you
10:09
want to take your end pieces that we
10:10
have cut apply some glue to it
10:23
they’re going to put it directly and top
10:25
of that end make sure that it’s even now
10:30
to avoid this part if you don’t want to
10:32
do it like this then you can always make
10:35
your bottom pieces just a tiny bit
10:37
taller you can make this piece and this
10:44
piece a quarter inch taller but i just
10:48
thought it would be easier to do the
10:50
holes this way so that’s why i did not
11:00
ok so what I’ve done is I’ve added my
11:03
parts there now I’m going to add my
11:05
template on top and press it down
11:25
you want to make sure it’s even so it’s
11:27
not bending on the side
11:45
all right now once you get press down
11:47
and you want to layer of Mod Podge again
11:50
ok so once you have that done then you
11:52
want to glue your sides on
12:01
put a little bit right here on this edge
12:02
to and over here on this edge
12:12
and then you want to go right there in
12:26
should look kinda like that and then do
12:29
the other side the same way
12:32
okay now you’re going to take the second
12:34
piece here and you’re going to cut it
12:36
and fit right in between here and make
12:45
sure that you have it even with the top
12:56
go ahead and rub your glue into that
12:58
opening if there is one because
13:00
sometimes the wood isn’t exactly level
13:03
or straight when you buy it so you
13:06
rather news in wood filler you can just
13:08
kind of put your glue in there and then
13:11
you’re gonna do the same thing to the
13:13
ok so once you have that done then you
13:16
want to tape it so that it’s secure
13:19
ok so to make our food people we are
13:22
going to be using some wooden craft
13:24
sticks and what we did is we cut a bunch
13:27
of them at 38 inches and then we’re
13:30
going to be drilling a hole right in the
13:33
center now I will tell you this the
13:36
drill bit that were using is actually
13:38
just a piece of wire and we ground the
13:41
end of it to make it to where we could
13:43
use it as a drill bit that way would be
13:44
the same size that you can use your
13:46
drill bit if you want
13:47
so he’s just kinda late just throwing it
13:51
right through there
14:00
let’s go into your fingers takes a
14:09
little bit of time but it works out
14:11
great because when you put it on top of
14:13
that or through the piece on the table
14:17
it’s going to go easier
14:20
ok so I just attached it onto the wood
14:23
and then you can stand them in pain on
14:25
whatever color you want but as you can
14:27
see it rotates now I used a piece of
14:30
baling wire to do this here and I
14:34
painted the inside and everything and I
14:36
actually paint the outside too but then
14:38
i sanded it i didn’t like the texture of
14:39
it being rough on the edge so i standed
14:43
the whole thing again and I’ll just
14:44
repaint it but your foods me and you can
14:49
paint any which way you want if you want
14:51
to get detailed or just paint solid
14:53
colors and sand them also as well
14:55
alright and then we’ll do the handles
14:58
the same way we’ll be back
15:03
ok so for your wire is just floral wire
15:06
and I put some duct tape around the end
15:08
of it to make the handle and then you
15:11
want to apply some crazy glue at the
15:13
very end to keep it from going forward
15:15
or backward with the duct tape because
15:17
sometimes they want to move after that
15:19
then you want to put it in your hole
15:21
right here and for my foosball people i
15:25
just took my research that looks like
15:27
this and I cut it to fit so it’s not
15:32
quite touching the bottom but it’s got a
15:37
tiny bit of space but it’s very close
15:39
then I took another piece of wire and I
15:43
use that as my drill and I poke the hole
15:46
in each one and then now I’m just
15:50
following the pattern on the template
15:51
and i’m applying them you have to work
15:56
it a little bit to get it in there
16:08
alright you want to do all of them just
16:10
like that slide it on there
16:13
ok when you get to the other side you
16:15
want to poke it through that hole on
16:16
that side once you get it in that hole
16:25
push it all the way through to wear this
16:29
is touching the wood on this side then
16:32
take your pliers and you want to put a
16:38
bend and the wire so it should look like
16:44
that once you have it done
16:48
push your bar all the way across to
16:52
where it’s like this and then adjust
16:58
your foosball people to match this side
17:36
now you can apply a little bit of glue
17:38
on each one if you want on the sides of
17:40
it to keep them from sliding back and
17:41
forth but if nobody’s really going to
17:43
play with it then you don’t need to
17:44
write you want to continue that process
17:49
along both sides again put a little dab
17:55
of crazy glue on the edge here and on
17:57
the edge of this side of the tape just
17:59
to keep it from sliding and then the
18:02
same way there you notice they do slide
18:15
now loose ball tables have stopper so if
18:19
you don’t want to bend your wire you can
18:21
glue a bead on the end rather than
18:23
gluing it i mean rather than bending it
18:26
alright continue this process with the
18:28
applying the race or to the wire and the
18:32
tape for the next two holes and then
18:34
you’ll be done and all you have to do is
19:02
ok guys thanks for watching and don’t
19:06
forget to follow doll house manager
19:07
madness and tutorials com also check us
19:10
out on facebook dollhouse my tremendous
19:12
and tutorials and on youtube like and
19:17
subscribe to the channel because we post
19:18
videos all the time and leave a comment
19:21
question or suggestion because we love
19:23
hearing from you and if you like
19:25
Pinterest we have tons of pens on there
19:27
as well under laurie holden Heisler I
19:29
think that have a great day